12/28/2009

Christmas Special: Gingerbread Cupcakes with Orange Frosting


Ok, this is the third and final Christmas installment. This is also the second variation on the gingerbread theme: gingerbread cupcakes with orange cream cheese icing.

If you have read this blog before then you know that cupcakes have a special place in my heart. These are a tasty twist on the classic spicy carrot cake and cream cheese icing combo. The cocoa powder deepens the flavor and color of the cupcakes without actually making them taste chocolate-y. The orange also lends a wonderfully fragrant zest to the frosting. This is my go-to cream cheese frosting recipe; it's decadently creamy but not so cheesy that it tastes like piped cheesecake.

These mini cakelets are a great addition to any holiday dessert table. I dressed mine up for the occasion with a bit of sparkle in the form of pastel dragees. I love how these little pearls shine like tiny Christmas ornaments.

Gingerbread Cupcakes
Yield: about 36 mini cupcakes

Ingredients

  • 5 tablespoons unsalted butter, softened
  • 1/2 cup white sugar
  • 1/2 cup unsulfured molasses
  • 1 egg
  • 1 egg yolk
  • 1 1/4 cups all-purpose flour
  • 1 tablespoon Dutch process cocoa powder
  • 1 1/4 teaspoons ground ginger
  • 1 teaspoon ground cinnamon
  • 1/2 teaspoon ground allspice
  • 1/2 teaspoon ground nutmeg
  • 1/4 teaspoon salt
  • 1 teaspoon baking soda
  • 1/2 cup hot milk

Directions

  1. Preheat the oven to 350 degrees F (175 degrees C). Butter or line with paper liners a 12-cup muffin tin.
  2. Cream 5 tablespoons of the butter with the white sugar. Add the molasses and the egg and egg yolk.
  3. Sift together the flour, cocoa powder, ginger, cinnamon, allspice, nutmeg and salt. Dissolve the baking soda in the hot milk. Add the flour mixture to the creamed mixture and stir until just combined. Stir in the hot milk mixture. Pour the batter evenly into the prepared tin.
  4. Bake at 350 degrees F (175 degrees C) for 20 minutes or until slightly springy to the touch. Allow to cool a few minutes in the pan and remove to a rack to cool.

Cream Cheese Frosting
Yield: 3 cups (enough to generously ice 36 mini cupcakes)

Ingredients

  • 2 (8 ounce) packages cream cheese, softened
  • 1/2 cup butter, softened
  • 2 cups sifted confectioners' sugar
  • 1 teaspoon vanilla extract
  • 1 teaspoon grated orange zest

Directions

  1. In a medium bowl, cream together the cream cheese and butter until creamy. Mix in the vanilla and zest, then gradually stir in the confectioners' sugar. Store in the refrigerator after use.
Recipe source: allrecipes.com
Image property of beets and bites

12/26/2009

Christmas Special: The Roast Beast at the Christmas Feast

I ended up spending the entire day in the kitchen. I did this quite happily, and entirely voluntarily. Since Christmas this year was unfortunately green and there were no snowmen waiting to be made, I busied myself in the coziness of the kitchen (and I think cooking is a great alternative to lazing on the couch watching Christmas specials on TV).

While cooking a traditional holiday feast appears to be a massive undertaking that strikes terror in the hearts of home cooks everywhere, a little planning means it usually goes quite smoothly.

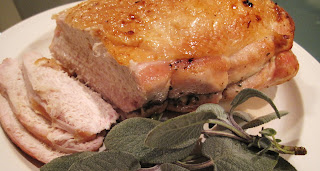
Because we had a modest number of diners, the turkey was not a massive beast of a bird in the oven. Our roast consisted of a turkey breast, which can still be tough to cook despite its diminutive size. Because it is so lean, it often becomes unpleasantly tough, dry, and stringy.

Leave it to Alton Brown to explain and emphasize the power of the brine. It is THE secret for a juicy bird. It is extremely simple, and after preparing turkey this way, you will never go back. The salt in the brine both seasons the meat and does something to the proteins that allows it to retain moisture better. Goodbye turkey jerky.

A few other little things about the turkey: use the canola oil specified in the recipe to coat the skin rather than butter. Starting the turkey in a 500 F oven means that you need to use oil with a high smoke point. I also like to baste it with a mixture of melted butter and maple syrup to encourage a nicely browned and sticky skin. Yum.

Besides the regular sides of roasted vegetables and garlic mashed potatoes, I made a classic bread stuffing. In order to deal with the problems of roasting the turkey with the stuffing stuffed in it (namely, that the meat is done before the stuffing is safely heated through), I baked the stuffing in a dish alongside the turkey. This recipe makes an extremely flavorful stuffing that's perfumed with onion, rosemary, thyme and sage, and punctuated with spicy sausage and sweet apple and cranberries. I probably could have had the stuffing alone for dinner and dispensed with everything else.

Overall, it was a dinner that successfully put everybody into a food coma...in a good way. I wouldn't have spent my Christmas Day any other way.

Good Eats Roast Turkey:

Ingredients
  • 1 (14 to 16 pound) frozen young turkey

For the brine:

  • 1 cup kosher salt
  • 1/2 cup light brown sugar
  • 1 gallon vegetable stock
  • 1 tablespoon black peppercorns
  • 1 1/2 teaspoons allspice berries
  • 1 1/2 teaspoons chopped candied ginger
  • 1 gallon heavily iced water

For the aromatics:

  • 1 red apple, sliced
  • 1/2 onion, sliced
  • 1 cinnamon stick
  • 1 cup water
  • 4 sprigs rosemary
  • 6 leaves sage
  • Canola oil

Directions

2 to 3 days before roasting:

Begin thawing the turkey in the refrigerator or in a cooler kept at 38 degrees F.

Combine the vegetable stock, salt, brown sugar, peppercorns, allspice berries, and candied ginger in a large stockpot over medium-high heat. Stir occasionally to dissolve solids and bring to a boil. Then remove the brine from the heat, cool to room temperature, and refrigerate.

Early on the day or the night before you'd like to eat:

Combine the brine, water and ice in the 5-gallon bucket. Place the thawed turkey (with innards removed) breast side down in brine. If necessary, weigh down the bird to ensure it is fully immersed, cover, and refrigerate or set in cool area for 8 to 16 hours, turning the bird once half way through brining.

Preheat the oven to 500 degrees F. Remove the bird from brine and rinse inside and out with cold water. Discard the brine.

Place the bird on roasting rack inside a half sheet pan and pat dry with paper towels.

Combine the apple, onion, cinnamon stick, and 1 cup of water in a microwave safe dish and microwave on high for 5 minutes. Add steeped aromatics to the turkey's cavity along with the rosemary and sage. Tuck the wings underneath the bird and coat the skin liberally with canola oil.

Roast the turkey on lowest level of the oven at 500 degrees F for 30 minutes. Insert a probe thermometer into thickest part of the breast and reduce the oven temperature to 350 degrees F. Set the thermometer alarm (if available) to 161 degrees F. A 14 to 16 pound bird should require a total of 2 to 2 1/2 hours of roasting. Let the turkey rest, loosely covered with foil or a large mixing bowl for 15 minutes before carving.

Sausage, Cranberry and Apple Stuffing:

Ingredients

  • 1 1/2 cups cubed whole wheat bread
  • 3 3/4 cups cubed white bread
  • 1 pound ground turkey sausage
  • 1 cup chopped onion
  • 3/4 cup chopped celery
  • 2 1/2 teaspoons dried sage
  • 1 1/2 teaspoons dried rosemary
  • 1/2 teaspoon dried thyme
  • 1 Golden Delicious apple, cored and chopped
  • 3/4 cup dried cranberries
  • 1/3 cup minced fresh parsley
  • 1 cooked turkey liver, finely chopped
  • 3/4 cup turkey stock
  • 4 tablespoons unsalted butter, melted

Directions

  1. Preheat oven to 350 degree F (175 degree C). Spread the white and whole wheat bread cubes in a single layer on a large baking sheet. Bake for 5 to 7 minutes in the preheated oven, or until evenly toasted. Transfer toasted bread cubes to a large bowl.
  2. In a large skillet, cook the sausage and onions over medium heat, stirring and breaking up the lumps until evenly browned. Add the celery, sage, rosemary, and thyme; cook, stirring, for 2 minutes to blend flavors.
  3. Pour sausage mixture over bread in bowl. Mix in chopped apples, dried cranberries, parsley, and liver. Drizzle with turkey stock and melted butter, and mix lightly. Spoon into turkey to loosely fill.
Image property of beetsandbites
Turkey recipe credit to Alton Brown and foodtv.com
Stuffing recipe credit to Stacy Polcyn
12/24/2009

Christmas Special: Cranberry Pistachio Shortbread and Gingerbread Men


So, I think it's about time for an update, don't you?

There was no way I could let the holiday season go by without a few festive food posts. Christmas is, after all, the most gluttonous of holidays. What other occasion encourages consecutive weeks of marathon eating? Besides that warm fuzzy feeling you get at this time of year, the abundance of great food and company make this my absolute favorite holiday.

I decided to fully embrace the holiday spirit today. So, after lighting the fireplace and blasting the carols, I did a little Christmas baking. The results: Cranberry Pistachio Shortbread, gingerbread cookies, and a house headily perfumed with spice.

These shortbread are cheerfully festive cookies. Shortbread is originally a Scottish Christmas cookie, but today its rich, crumbly, butteriness makes it a popular year-round treat. These boast that iconic red and green, which is happily achieved free of food coloring or cloyingly sweet candied cherries. These mildly sweet cookies are studded with bright ruby red cranberries and pale green pistachios for a treat that is at once tender and crunchy and chewy.

However, these shortbread only make up half of the quintessential Christmas dessert duo of fruity and spicy. The latter half is taken care of by the classic gingerbread cookie. This is my favorite recipe and I have used it for many years. As strange as it may sound, the dough has a beautiful texture to work with, even cold out of the refrigerator. The molasses keeps it soft and pliable and very easy to work with. After it bakes, it retains its chewiness while the edges crisp up. I suppose somewhat non-traditionally, I like to add a little finely ground black pepper to the dough. It imparts an extra kick of heat to bring out the spice, rather than a savory quality. The flavor improves the longer your store them (if they last that long).

(A tip for making gingerbread men: In order to make sure your shapes stay recognizable, it is advisable to chill them on the sheet pan before you bake them. It prevents them from melting into amoeboid blobs.)

This is the just the beginning of my Christmas cooking marathon. I actually need to return to the kitchen now to prepare tonight's big feast, so stay tuned for more on that.

And finally, I would like to wish you a Merry Christmas and Happy Holidays. May it be filled with fun, loved ones, and of course, fantastic food!

Cranberry Pistachio Shortbread

Yield: about 48 cookies

2 1/3 cups(300 grams) all-purpose flour

1/2 teaspoon kosher salt

1 cup (2 sticks) (226 grams) unsalted butter, room temperature

2/3 cup (135 grams) granulated white sugar

1 teaspoon pure vanilla extract

1 cup (130 grams) unsalted pistachios, coarsely chopped

1 cup (150 grams) dried cranberries, coarsely chopped

In a large bowl whisk the flour with the salt.

In the bowl of your electric mixer (or with a hand mixer), cream the butter until smooth (about 1 - 2 minutes). Add the sugar and beat until smooth and creamy (about 3 minutes). Beat in the vanilla extract. Gently stir in the flour mixture just until incorporated. Fold in the chopped pistachios and dried cranberries. (Make sure that the nuts and cranberries are evenly distributed throughout the dough.)

Divide the dough in half. Place each half of dough on the center of a 14 inch (35 cm) length of parchment or wax paper. Smooth and shape the dough into an evenly shaped rectangle that is about 10 inches (25 cm) long and 2 inches (5 cm) wide. Then thoroughly wrap the shaped logs in the parchment or wax paper, twists the ends of the paper to seal the logs, and place in the refrigerator to chill for at least two hours, or up to three days. (The logs can also be frozen for about two months. If freezing, it is best to defrost the logs in the refrigerator overnight before slicing and baking.)

Preheat oven to 325 degrees F (160 degrees C) with the rack in the center of the oven. Line two baking sheets with parchment paper.

Using a thin bladed knife, slice the logs into 1/4 to 1/2 inch (.5 to 1 cm) thick cookies. Place the cookies on the prepared baking sheet, spacing about 2 inches (5 cm) apart. Bake for about 15 - 20 minutes, or until the cookies are just beginning to brown around the edges. Remove from oven and cool on a wire rack.

Makes about 48 shortbread cookies.

Perfect Gingerbread Cookies

Yield: about 2 dozen

1/2 cup butter, softened
1/2 cup sugar
1/2 cup molasses
1 egg yolk
2 cups sifted flour
1/2 teaspoon salt
1/2 teaspoon baking soda
1/2 teaspoon baking powder
1/2 teaspoon cinnamon
1 teaspoon ground cloves
2 teaspoons ground ginger
1/2 teaspoon nutmeg
1/4 teaspoon ground black pepper

  1. Cream together butter and sugar until smooth. Stir in molasses and egg yolk. In a separate bowl, stir together the flour, salt, baking powder, baking soda, cinnamon, cloves, ginger, nutmeg, and black pepper. Stir into the butter mixture until smooth. Gather into a ball, flatten, and wrap in plastic wrap. Chill for at least one hour.
  2. Preheat the oven to 350 degrees F (175 degrees C). On a lightly floured surface, roll the dough out to 1/4 inch thickness. Cut with cookie cutters. Place cookies 2 inches apart on ungreased cookie sheets.
  3. Bake for 8 to 10 minutes in the preheated oven, until firm at the edges. Cool for 5 minutes on the pan. Remove from cookie sheets to cool on wire racks.

Images property of beets and bites
Shortbread recipe from joyofbaking.com

11/01/2009

Where to eat: Buddakan NYC

Dining out at an upscale restaurant is often an experience, rather than just an opportunity to grab a meal and get on your way. For this reason, I am going to warn you that this review contains *spoilers* and if you want the full experience, stop reading now.


You have been warned...

Buddakan NYC was opened by Zagat's 2007 Restaurateur of the Year, Stephen Starr. He is also known for many restaurants in Philadelphia, and Morimoto (as in the Iron Chef Morimoto) in New York. Needless to say, I had high hopes for this meal. And in many ways, these expectations were definitely met.

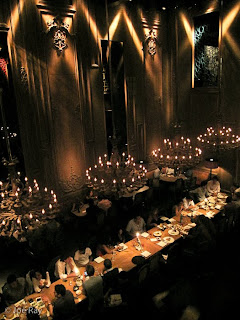
The restaurant entrance is discreetly marked with one small sign next to the door, which suggests a mysterious "secret location" vibe, although the restaurant itself is definitely no secret (see fun fact below). Diners are received at the front desk which is a long counter strangely resembling a hotel concierge. They wait for their tables in the bar and lounge area. All is dimly lit by yellow overhead lighting and lamps on the tables. The atmosphere: definitely sophisticated and plush. The dining area is concealed around the corner on the lower level. The main dining room is, in a word, opulent. A long communal table stretches down the center and ornate chandeliers hang overhead from the high ceiling. The entire room is cast in a pinkish gold light. There are several dimmer, smaller dining rooms off the sides. All are equally sumptuous, and this is where I enjoyed my meal.

I was looking forward to raving about the entire meal. And at the beginning, it looked promising. They serve this divine cocktail called Fate, made with pineapple, elderflower and prosecco. It's as delicious as it sounds. I had done a light research beforehand, so I knew that we had to order the Edamame Dumplings as an appetizer. Another reviewer had said that they surely would be on the menu in heaven. I couldn't agree more. The dumplings were steamed and filled with a smooth and creamy filling. The texture was like a mousse, and tasted somewhat mushroom-y or truffle-y. They were served in a slightly tangy shallot-sauternes broth which perfectly balanced the richness of the filling. I could have had an entire meal of them.

The two main course dishes were Dungeness Crab Sticky Rice and Mao Poe Tofu. The crab rice was served in the crab shell. It was perfectly cooked and showcased the lump crabmeat well. The tofu, which came recommended by several reviews including one in the New York Times, was not quite as tasty. The tofu was cooked with ground pork and red pepper but it just was not anything special. It came with a bowl of plain ol' white rice. I could have done without that one.

Vanilla Tea Doughnuts were for dessert. These came with mandarin marmalade and vanilla ice cream. The dessert was well thought out; the bitterness of the marmalade and cold ice cream worked well with the hot and sweet doughnuts. Unfortunately, the doughnuts were heavy pieces of fried dough. They were dense and rather bland. However, they were rolled in a tea sugar which was wonderfully fragrant.

In general, Buddakan is very, very far from being a bad restaurant. The servers are nice and helpful, and the service is prompt but not rushed. The crowd is pleasant and the ambiance is amazing. The food is also great in general. Just a word of advice: order double the dumplings. And skip the doughnuts (I hear the Crying Chocolate is better anyways).

(Fun fact: Buddakan is the setting of Carrie and Big's rehearsal dinner in the Sex and the City movie.)

Eat Here:
75 9th Ave
New York, NY 10011-7006
(212) 989-6699

Image credit: francoissimon.typepad.fr

It's Aliiiive! (the blog.) and Mushroom Risotto (the food.)

Greetings, food fans! I'm back and I apologize for being rather remiss in terms of updating this... The lack of any October entries in the archive is rather sad, but I'm going to start off November correctly! I think it appropriate that the start of the month signals the beginning of the season for comfort food. The best comfort food should be both comforting to make as well as to eat. I find risotto, a traditional Italian rice, plays both roles quite well.

Making risotto is a bit of a process. It takes about 20 minutes of continuous stirring to release the starch that creates that crucial creamy consistency. The cooking liquid (broth or stock) is gradually added as the rice cooks; simply dumping it in will not result in the right texture. (I unfortunately speak from experience...) Risotto is not something to stress over (it is comfort food, after all) but it requires some patience. The slow stirring of a bubbling pot is really all that is required, and the effort is well rewarded in the end.

Risotto cannot be rushed, but once it is made it needs to be consumed while it retains the perfect slumped-on-the-plate, neither-gluey-nor-soupy texture. (I remember hearing that many Italians refuse to eat leftover risotto as-is, which led to the invention of those delicious fried risotto balls, arancini.) When done right, fresh risotto can be a big bowl of bliss.

Today, I made the classic mushroom variation. Dried porcini mushrooms give the risotto a warm earthiness and "mushroominess", while the fresh wild mushrooms are dressed with a zesty lemon vinaigrette. The contrast of the two preparations is genius, to which I must credit Jamie Oliver. Here, I used portobello and crimini mushrooms, but if you have access to other varieties of mushrooms then I can think of very few better ways to use them.
(On a side note, Whole Foods would be a good place to look; I recall seeing golden chanterelles, speckled lobster and black trumpet mushrooms the last time I checked. It was rather exciting.)

On an unrelated note, a new website has wandered onto my radar: cookstr.com. It boasts an extensive collection of recipes from famous chefs and cookbook authors. The recipes span all skill levels and cuisines, and many are accompanied by the all-important hunger-inducing photos.

Grilled Mushroom Risotto

Ingredients

  • 6 1/3 cups chicken stock
  • Handful dried porcini mushrooms
  • Olive oil
  • 1 small onion, peeled and finely chopped
  • 2 sticks celery, trimmed and finely chopped
  • 14 ounces risotto rice
  • 2/3 cup vermouth or white wine
  • Sea salt and freshly ground black pepper
  • 4 large handfuls wild mushrooms (try chanterelles, shiitake, black trumpet or oyster - definitely no button mushrooms, please!), cleaned and sliced
  • Few sprigs fresh chervil, tarragon or parsley, leaves picked and chopped
  • 1 lemon, juiced
  • 2 tablespoons butter
  • 2 handfuls freshly grated Parmesan, plus extra for serving
  • Extra-virgin olive oil

Directions

Heat stock in a saucepan and keep it on a low simmer.

Place the porcini mushrooms in a bowl and pour in just enough hot stock to cover. Leave for a couple of minutes until they've softened. Fish them out of the stock and chop them, reserving the soaking liquid.

In a large pan, heat a glug of olive oil and add the onion and celery. Slowly fry without coloring for at least 10 minutes, then turn the heat up and add the rice. Give it a stir. Stir in the vermouth or wine - it'll smell fantastic! Keep stirring until the liquid has cooked into the rice. Now pour the porcini soaking liquid through a sieve into the pan and add the chopped porcini, a good pinch of salt and your first ladle of hot stock. Turn the heat down to a simmer and keep adding ladlefuls of stock, stirring and massaging the starch out of the rice, allowing each ladleful to be absorbed before adding the next. Carry on adding stock until the rice is soft but with a slight bite. This will take about 30 minutes.

Meanwhile, get a dry griddle pan hot and grill the wild mushrooms until soft. If your pan isn't big enough, do this in batches. Put them into a bowl and add the chopped herbs, a pinch of salt and the lemon juice. Using your hands toss everything together - this is going to be incredible!

Take the risotto off the heat and check the seasoning carefully. Stir in the butter and the Parmesan. You want it to be creamy and oozy in texture, so add a bit more stock if you think it needs it. Put a lid on and leave the risotto to relax for about 3 minutes.

Taste your risotto and add a little more seasoning or Parmesan if you like. Serve a good dollop of risotto topped with some grilled dressed mushrooms, a sprinkling of freshly grated Parmesan and a drizzle of extra-virgin olive oil.

Serves 4-6

Recipe courtesy of jamieoliver.com
Image property of beets and bites

9/17/2009

Mmmmaple: Maple Walnut Cupcakes

As the summer heat dissipates, I think it is only appropriate to whip out some autumnal creations. These Maple Walnut Cupcakes not only give off the perfect fall vibe, but also showcase one of my all-time favourite flavours: maple.

The nutty cupcakes are wonderful, but I'm going to talk about the icing because it really is "the icing on the cake." Its velvety butteriness amplifies the warmth of the maple flavour. I knew I had to try this frosting recipe because, well, it uses real maple syrup, rather than that artificial stuff in a bottle. It is not a speedy one-bowl powdered sugar buttercream; this is real, silky, luscious stuff. You will need to cook the maple syrup to make this version of a French buttercream so it's a little fussy, but the results are well worth it if you are a maple lover.

I made this on an unusually warm day. If you want to stabilize such a butter-rich frosting, beat in a few tablespoons of cool shortening and a tablespoon or two of sifted cornstarch. Add just enough to give it a little structure, but not so much that you lose the silky, fragrant character of the buttercream.

Maple-Walnut Cupcakes

2 3/4 cups all-purpose flour, sifted
1 tablespoon baking powder
1/4 teaspoon salt
1 teaspoon ground cinnamon
2 sticks (1 cup) unsalted butter at room temperature
1 1/2 cups sugar
3 large eggs
1 teaspoon vanilla
1 cup milk
1 1/2 cups walnuts chopped medium fine

Preheat oven to 350 F. Line two standard 12-cup muffin pans with paper liners. In a large bowl, sift together flour, baking powder, salt, cinnamon and set aside.

In the bowl of an electric mixer fitted with a paddle attachment, beat butter and sugar on medium until creamy, about 3 minutes. Add the eggs and vanilla and beat until combined. With the mixer still on medium, add the flour mixture in two parts, alternating with milk (begin and end with flour). Stir in walnuts with a spoon.

Divide batter among the cups (about 1/3 cup each). Bake until toothpick inserted in the center comes out clean, about 18-20 minutes. Cool and frost. Cupcakes can be refrigerated for up to 3 days.

Maple Buttercream:

Makes about 2 cups

3 large egg yolks
2 cup pure maple syrup
2 sticks (1 cup) unsalted butter

In the bowl of an electric mixer fitted with the whisk, beat yolks on high speed until light and fluffy, about 5 minutes. In a small saucepan, bring the syrup to a boil over medium high heat, cook until it reads 240F on a candy thermometer, about 15 minutes.
With the mixer running, slowly pour syrup down the side of the bowl in a slow, steady stream, until completely incorporated, about 1 minute. Continue beating until the bowl is just slightly warm to the touch, 4-5 minutes. Add butter, one piece at a time, until frosting is fluffy, about 4 minutes.

Recipe courtesy of Martha Stewart's Baking Handbook
Image property of beets and bites

9/13/2009

Crepes...Fancy French Fare?

Crepes can be a little tricky to make, but as soon as you have the "pan swirl" move down, you can impress your guests for breakfast, lunch, dinner, and dessert. (Really.)

Crepes are extremely versatile; you can make them savoury or sweet, dressed up or down. You can crisp up a crepe in a muffin tin and you have a tart shell, or stack them up to make a crepe gateau. (One of my favorite desserts in New York City is the Lady M Mille crepe. Paper thin crepes are layered with whipped cream and finished with caramelized sugar. So decadent!)

Lady M works her magic

I made these for breakfast, so they were served with whipped cream and berries. I also like them the French way: plain with a squeeze of lemon and sprinkling of sugar, known as crepes au sucre.
(If you want something absolutely lethal, fill a sweet crepe with Nutella chocolate hazelnut spread, and some chopped toasted hazelnuts. Serve it up and be showered with praise.)

Crepes:

4 eggs
1 1/2 cups milk
2 tablespoons oil or melted butter
1 cup all purpose flour
1/2 teaspoon salt
2 tablespoons sugar (for sweet crepes)

In a medium bowl, beat eggs slightly. Add remaining ingredients and beat until smooth. Batter may be covered and refrigerated up to 2 hours or cooked immediately. Heat crepe pan over medium high heat. A few drops of water should bounce and sizzle when heated properly. Grease pan lightly with oil. Pour scan 1/4 cup batter into pan, immediately swirling to coat evenly. When crepe is light brown around the edges and set (about 2 minutes) flip and brown on the other side.

Yield about 20 crepes

Storage: Wrap well in foil and store in refrigerator up to 3 days, or freeze up to 3 months. To thaw, place package in 300F oven for 10-15 minutes

Where to eat:

Lady M Confections
41 E 78th St
New York, NY 10075-0271

Credit to the Pillsbury Cookbook
Image property of beets and bites and uppereast.com

9/06/2009

Savouring Summer: Barbequed Ribs and Grilled Corn

I hope everyone's enjoying the last weekend of summer. For me, one of the quintessential foods of summer is fresh corn. And when you live in British Columbia, there is nothing quite like Chilliwack Triplesweet Jubilee corn. The name is no lie; these bright yellow beauties are crunchy and sweet as sugar. They can be hard to find in supermarkets, where the Peaches and Cream variety reigns supreme. You can always drive to one of the bright yellow "Sparkes Corn Barns" to load up though.

Summer also calls for outdoor grilling. I think the best grilled item to go with all that corn is barbequed ribs. When you really take the time to baste it with saue and let it caramelize and go crunchy, there is nothing else like it. Both dishes are simple to make, and extremely tasty. Give them a try while it's still warm enough to fire up that grill!

One more note: One of the unfortunate results of the closing of summer is the start of the busy fall season. And for me, that's back to work. I will continue updating (hopefully often) but a little less frequently. Keep an eye out for time and wallet friendly dishes in coming weeks.

Best Baby Back Ribs

Ingredients

  • 2 racks baby back ribs (about 2 1/2 pounds)
  • 1 recipe Barbecue Sauce, recipe follows

Directions

Preheat oven to 350 degrees F.

Cut the racks of ribs in half crosswise. Rub the ribs, paying special attention to the meaty side, with 1/2 cup of the sauce. Lay the rib pieces meat side down in an 11 by 13-inch baking dish. The pieces will overlap slightly.

Cover the dish tightly with aluminum foil and bake until the meat begins to pull away from the ends of the bones and the ribs are just tender, about 1 hour. You can bake the ribs up to a day before and keep them refrigerated. Bring refrigerated ribs to room temperature about 1 hour before you grill them.

Preheat an outdoor grill to medium-high heat. Grill the ribs, brushing them with about half the remaining sauce, until they're crispy and heated through, about 10 minutes. Move the ribs around as they grill, the sugar in barbecue sauce makes it easy for them to burn. Let the ribs rest for 5 to 10 minutes before cutting them into 1 or 2-bone pieces. Put out the rest of the sauce for dipping or brush it over the ribs.


Classic Barbeque Sauce

1 cup water
3/4 cup light corn syrup
1/2 cup tomato paste
2/3 cup vinegar
1/3 cup dark brown sugar
3 tablespoons molasses
1 1/4 teaspoons liquid smoke
1 teaspoon salt
1/4 teaspoon onion powder
1/4 teaspoon ground black pepper
1/4 teaspoon ground mustard
1/8 teaspoon paprika
1/8 teaspoon garlic powder
Dash of cayenne pepper

Combine all ingredients in a medium saucepan over high heat and whisk until smooth

Bring mixture to a boil, then reduce heat and simmer 45 minutes or until thick.

Store in the refrigerator.

Makes 1 1/2 cups.

Grilled Corn

Corn on the cob-however many ears you want to make

Peel back the husks without removing them and remove the silky threads. Cover the corn again with the husks.

Soak in cold water for 30 minutes

Grill 20 minutes (give it a quarter turn every 5 minutes) or until the husks char and you smell the sweetness of the corn.

Slather on some butter and dig in.

Ribs recipe adapted from Dave Lieberman and the Food Network
Barbeque Sauce recipe from Top Secret Recipes
Corn recipe and images property of beets and bites

8/30/2009

"If You're Afraid of Butter, Use Cream" --Julie and Julia

I'd been feeling a little uninspired lately. I blame this on the depression that comes with the end of summer and the return to normal humdrum life as the weather cools and September rolls around.

However, if there's one movie to watch to get you out of a food rut, that would be Julie and Julia. This movie is the new darling of the food world; I saw the Food Network promoting a related event and contest a few days ago. It has also sparked interest in French cuisine; Julia Child's "Mastering the Art of French Cooking" shot to #1 on Amazon's bestseller list soon after the movie's release. It has also created some rather terribly pun-y critics' reviews, which mention the film "leaving audiences hungry for more" or Nora Ephron concocting "the perfect recipe" for a great movie.

Cliched reviews or not, I knew I had to see it as soon as I heard about it... I mean, it is about cooking and blogging. Or, as it turns out, much more than that. Ephron tactfully translates the passion that many foodies have for cooking and eating onto the big screen. And just as seeing a Broadway show makes me want to dance, seeing all the incredible looking food blown up on a giant movie screen made me want to cook.

And cook I did. I'm not really a fan of French food. Maybe it's just my limited experience with it, but it all seems too fussy and too buttery. But the movie made me want to cook something rich and wine-y. This speedy dish has flavours reminiscent of Julia Child's famed Boeuf Bourguignon. It was also inspired by my favourite scene from the movie, which I will only here describe as "the onion scene."

This was rather satisfying to make; the onion slicing and wine deglazing made me feel "just like Julia." Now, I'm just waiting for that book contract.


Kidding.


Garlic Mashed Potatoes with Wild Mushroom Ragout

1 large russett potato
2 cloves roasted garlic, minced (see Note)
1/4 cup whole milk
2 tablespoons butter

2 cups assorted wild mushrooms (I used portobello and shiitake)
1 red onion, halved and thinly sliced
1 tablespoon brown sugar
1 clove garlic, minced
2 sprigs fresh thyme
1/2 cup red wine
2 tablespoons butter, cold

Peel the potato and cut into large 1 inch chunks. Drop into salted boiling water and cook until tender (about 10 minutes). In a small saucepan, heat milk and butter until hot. Mash the potato with the roasted garlic and add milk mixture until desired consistency is reached. Season with salt and pepper.

In a medium saute pan, slowly caramelize the onion in olive oil until browned and sticky (about 20-30 minutes). Stir in the brown sugar until melted and remove from the pan. Wipe out the pan and in another good splash of oil, brown the mushrooms. As Julia said, don't crowd the pan or the mushrooms won't brown. Once the mushrooms have given up about half their liquid, add the garlic and thyme. About a minute later, return the onions to the pan. Deglaze with red wine and reduce until little wine remains. Stir in the butter to finish the sauce.

Serve the mushroom ragout over the mashed potatoes. Bon appetit.

Note: To roast garlic, slice the top off of a head of garlic. Drizzle olive oil over the exposed cloves. Wrap in foil and roast in a 400F oven for abour 30 minutes, or until browned and meltingly soft.

Recipe and image property of beets and bites

8/27/2009

Use Your Noodle: Asian Peanut Noodle Salad

These noodles are big on peanut and sesame flavour. This an excellent make-with-whatever-is-in-the-fridge dish. It's also perfect to make extra for lunch the following day.

I used cucumber, mango, and grape tomatoes here. Other tasty things to throw in:
-shredded carrot
-bean sprouts
-bell peppers
-green onion
-snow peas
-cooked, shredded chicken
-cooked prawns
-firm tofu
-toasted cashews
-chopped peanuts
-toasted sesame seeds
-fried noodle/wonton strips

I like to use fresh ramen noodles, but they're a little hard to find. You can substitute capellini (angel hair pasta) or whole-wheat spaghetti (as in the recipe) instead. It'll be just as delicious, promise.

Asian Peanut Noodle Salad

Ingredients

Serves 4

  • Coarse salt
  • 12 ounces whole-wheat spaghetti
  • 1/4 cup creamy peanut butter
  • 3 tablespoons dark-brown sugar
  • 2 tablespoons rice vinegar
  • 2 tablespoons soy sauce
  • 1 tablespoon toasted sesame oil
  • 2 garlic cloves, minced
  • 1/2 to 1 teaspoon red-pepper flakes

Directions

  1. In a large pot of boiling salted water, cook spaghetti 3 minutes less than al dente. Drain pasta.
  2. Meanwhile, in a large bowl, whisk together peanut butter, sugar, vinegar, soy sauce, oil, garlic, and red-pepper flakes. Add hot pasta and vegetables; toss to coat, thinning sauce with a little pasta water, if necessary. Serve at room temperature or chilled.
Adapted from Martha Stewart (May 2008)
Image property of beets and bites

8/26/2009

Simple and Sublime: The Best Beef Sandwich

This is one satisfying sandwich. No thin sliced cucumber on crust-less white plastic bread here. I think the star of this beefy sandwich has to be the caramelized onions. Slowly cooked until it gets brown and sticky, it's the stuff that gets people coming into the kitchen and asking "What smells so good?" The scent of sauteed onions is the ultimate draw of sidewalk hot dog carts for me anyways.

I don't think this sandwich requires a recipe... rather "Instructions for Construction":

Best Beef Sandwich:

1. Caramelize onions (see below for recipe), place to the side and wipe out pan.
2. Saute 6 large mushrooms, sliced into 1/4" slices, in a good swish of olive oil. Don't crowd the pan or the mushrooms will boil rather than brown. Add a clove of minced garlic when the mushrooms are half done. Cook until most of the water has evaporated and mushrooms are soft and browned. Place to the side.
3. Prepare the bread: I used a baguette. Split it in thirds and the halve each roll to open it up. Brush the inside with some olive oil (garlic and herb oil is really nice...see below for recipe). Toast in 375F oven until lightly browned.
4. In a lightly oiled pan, cook the beef (thinly sliced; you can buy it or slice it off a partially frozen steak if you like) until nearly all the pink is gone. Season with salt and pepper and a splash or worcestershire sauce.
5. Spread a few teaspoons of dijon mustard on your toasted bread. Layer a few slices of beef, the mushrooms, and then the onions. Serve with a side salad. Squish down and enjoy (sans fork and knife, of course).

Caramelized Balsamic Onions:

1 large onion
1 tablespoon butter
Olive Oil
Salt
Pepper
2 teaspoons dark brown sugar
2 tablespoons balsamic vinegar

Halve the onion and thinly slice (~1/8") into half-rings. In a medium saute pan, melt a tablespoon of butter and a good splash of olive oil. Cook onions over medium-low heat or until very soft, translucent, and starting to brown (at least 15 minutes). Season with salt and pepper, add dark brown sugar and stir until sugar is melted and onions are coated. Add balsamic vinegar and stir. Cook one minute more until onions are beautifully, stickily glazed.

Garlic and Herb Oil:
So great for sandwiches and quick croutons.

2 cloves garlic, smashed
1 sprig rosemary, bruised with the back of a knife
A few stems of thyme
1/3 cup olive oil

Combine everything in a small saucepan. Heat slowly over low heat until small bubbles start forming. Turn off the heat and allow to infuse for an hour or two. Store excess in a jar in the fridge (keep garlic and herbs in the oil) for up to three weeks.

Recipe and images property of beets and bites

8/24/2009

Devilishly Delicious: Raspberry-filled Cupcakes with Whipped Chocolate Ganache

I like cupcakes; I think they're a happy sort of food. That requisite swirl of frosting is just so decadent looking. Unfortunately, the icing can be so sugary that it makes my teeth hurt just thinking about it. These ones are deeply, darkly chocolate. I think chocolate ganache is my new favourite cupcake topping. Whipping it allows you to pipe it as nicely as any frosting, but it's more sophisticated and less sugar-packed than true icing sugar frosting, and it's faster to make than buttercream. It tastes almost truffle-y.

The base is a devil's food cake. This is an old family recipe that makes a very dark, moist chocolate cake very quickly. You can see that the directions pretty much read like they do off a box of cake mix. The terribly difficult part is measuring everything into one big bowl. If you've got measuring equipment, there's no reason to make cake out of a box when this is SO easy.

Chocolate ganache should be simple. It has two ingredients: chocolate and cream. This magical mixture can be made into truffle centers, poured as a glaze, whipped into mousse, or piped as frosting. It all depends on the ratio of cream to chocolate. I was faced with a challenge though when I chopped up a half pound of good 70% dark chocolate and made it into ganache, only to find out that there really is such a thing as "too dark." The ganache was not sweet at all, and almost offensively bitter. I looked online to determine how to sweeten ganache that's been made and cooled, but no luck.

I believe that food can sense your fear, so if you take charge, things tend to turn out better. Still, chocolate can be quite temperamental: add a drop of water to melted chocolate and it will seize, heat it too much and it'll split. So I was hesitant to beat in a few tablespoons of corn syrup, but was relieved to see that it worked. Adding a dab of raspberry preserves to the center of the cupcake resulted in a delicate balance of bitter and sweet, creamy and cake-y, chocolately and fruity. Adorn the tops with fresh raspberries and present with a flourish.

Raspberry-filled Chocolate Cupcakes with Whipped Chocolate Ganache

1 recipe Devil's Food Cake, baked into cupcakes
1 recipe Whipped Chocolate Ganache
1/2 cup seedless raspberry preserves
Fresh raspberries for garnish

Make a hole in the center of each cupcake: Use a large metal star tip (from a piping bag); push into cake and twist. Remove the center of the cut out.

Use a piping bag to fill each hole with raspberry preserve. Use a large star-tipped piping bag to pipe a swirl of ganache on each cupcake. Decorate with raspberries.

Store in the fridge, up to 3 days. Serve at room temperature.

Makes 20 cupcakes

Devil's Food Cake

1 1/2 cups all purpose flour
1 1/4 cups sugar
1/2 cup cocoa
1 1/4 teaspoon baking soda
1 teaspoon salt
1 cup buttermilk
2/3 cup oil
1 teaspoon vanilla
2 eggs

Heat oven to 350F. Grease and lightly flour 2 8" cake pans (or 20 lined muffin tins). In a large bowl blend all ingredients at low speed until moistened. Beat 3 minutes at medium speed. Pour batter into prepared pans and bake for 25-30 minutes (20 minutes for cupcakes) or until toothpick inserted in the center comes out clean. Cool 5 minutes before removing from pan.

Yields 2-8" layers or 20 cupcakes.

Whipped Chocolate Ganache

2 1/2 cups heavy whipping cream
1 pound bittersweet chocolate, chopped (~60%; anything higher and the ganache gets very bitter)

Place chopped chocolate in a medium bowl. In a medium saucepan, heat whipping cream to a boil. Boil for one minute (important to evaporate some water). Pour cream through a sieve over chopped chocolate. Do not stir; allow to sit for 2-4 minutes. Use a spatula to gently stir in concentric circles (start in the center of the bowl and stir outwards) until thoroughly mixed.

Place plastic wrap directly on top of ganache to stop a film from forming. Allow to cool to room temperature, about 3 hours.

Whip at medium-high speed until lightened in colour and fluffy. Do not overbeat or ganache will get grainy (to fix grainy ganache, melt the whole thing down, cool, and beat again).

Makes about 2 1/2 cups; enough to frost 24 cupcakes

Note: To fix ganache that's too bittter, beat in 1-2 tablespoons of corn syrup

Ganache recipe adapted from marthastewart.com
Cupcake and cake recipe and image property of beets and bites

8/20/2009

Speak Your Mind!

Comments are now enabled!

Ugly Duckling: Pappardelle with Slow-Braised Leeks and Porcini Pangrattato

Alright, so this is not the prettiest pasta at the party, but it is SO delicious I couldn't care less. I swear Jamie Oliver is a culinary genius.

Pangrattato is the crunchy breadcrumb topping sprinkled on right before serving. I remember hearing that it was created out of frugality long ago as a substitute for cheese. This stuff gives the dish an unusual kick (it's great on risotto too).

While the plate looks plain, there are many complex flavours and textures swirling around. There's the intense aromas of garlic, wine, mushrooms and thyme, then the salt of the proscuitto, the velvet silkiness of pasta and sweet leeks, and the crunch of the pangrattato. There's tons going on but it's somehow both contrasting and harmonious at the same time. Need I say more to convince you to try this? No?

Well, here's the recipe...

But one more note on leeks. They're one of the dirtiest vegetables you can buy from the produce stand. To clean leeks:
-cut off the dark leaves and take a thin slice off the root end. Peel off the tough, dark outer layer
-split the leek down lengthwise
-rinse under running water, leaves side down, opening the layers up to get most of the grit out (so you don't ruin your knife trying to chop through sand)
-slice into ribbons (or as your recipe calls for them)
-soak in a bowl of cold water, separating the layers. This will allow and remaining sand and dirt to fall to the bottom
-remove the leeks with a strainer

Cheat's Pappardelle with Slow-Braised Leeks and Crispy Porcini Pangrattato

Ingredients

  • 5 big leeks, outer leaves trimmed back, washed
  • Olive oil
  • 3 good knobs butter, divided
  • 3 cloves garlic, peeled and finely sliced
  • A few sprigs fresh thyme, leaves picked
  • A small wineglass white wine
  • Sea salt and freshly ground black pepper (Omit the salt if the ham is salty)
  • 1 pint good-quality vegetable or chicken stock
  • 12 slices ham, preferably Parma
  • 2 (8-ounce) packages fresh lasagne sheets (I cooked dried pappardelle instead)
  • All-purpose flour, for dusting
  • 2 handfuls freshly grated Parmesan, plus extra for serving

Pangrattato:

  • 1 small handful dried porcini mushrooms
  • 1/2 ciabatta bread, preferably stale, cut into chunks
  • Sea salt and freshly ground black pepper
  • Olive oil
  • 2 cloves garlic, crushed
  • 1 sprig fresh rosemary

Directions

Halve the leeks lengthways and cut at an angle into 1/2-inch slices. Heat a wide saucepan, add a splash of oil and a knob of butter, and when you hear a gentle sizzling add the sliced garlic, thyme leaves and leeks. Move the leeks around so every piece gets coated. Pour in the wine, season with pepper and stir in the stock. Cover the leeks with the slices of Parma ham, place a lid on the pan and cook gently for 25 to 30 minutes. Once the leeks are tender, take the pan off the heat.

To make the pangrattato:

Whiz the mushrooms and bread with a pinch of salt and pepper in a food processor until the mixture looks like bread crumbs. Heat a generous glug of olive oil in a frying pan. Add the garlic cloves and the rosemary and cook for a minute, then fry the bread crumbs in the oil until golden and crisp. Keep shaking the pan - don't let the bread crumbs catch on the bottom. Drain on paper towels, discard the rosemary and garlic and allow the bread crumbs to cool.

Bring a big pan of salted water to the boil. Lay the lasagne sheets on a clean working surface and sprinkle with a little flour. Place the sheets on top of each other and slice into 1/2-inch strips. Toss through your fingers to shake out the pappardelle, then cook in the boiling water 2 minutes or until al dente.

Remove the Parma ham from the saucepan, slice up and stir back into the leeks. Season to taste with salt and pepper, then stir in the Parmesan and the rest of the butter. Drain the pasta, reserving a little of the cooking water, and add the pasta to the leeks. Add a little of the cooking water if need be, to give you a silky, smooth sauce. Serve quickly, sprinkled with some pangrattato, extra Parmesan and any leftover thyme tips. Serve the rest of the pangrattato in a bowl on the side.

Recipe courtesy of Food Network and Jamie at Home
Image property of beets and bites

8/19/2009

Sorta Speedy Shortcut Spanakopita

If you frequent this blog, (thank you, by the way) you probably will have noticed that I use filo pastry pretty often. This is partly coincidence, and partly because when I buy filo dough, the boxes have about 30+ sheets in them. It's not the best idea to thaw and refreeze it all, so here we go again; here's one more of the million and one ways to use filo.

Spanakopita is Greek spinach pie. Here, crispy phyllo is wrapped around a filling of spinach, onion, feta cheese, and egg. It's a tasty way to get your veg and its portability makes it a good picnic candidate too.

This is one of hundreds of different versions. I take a shortcut by using frozen spinach; if you want to cook and drain a couple pounds of fresh spinach, then by all means go for it. There are also recipes that call for dill, parsely, or green onion. Some are built in a pan and then served in slices. I like to make mine this way because you get more crunchy pastry per serving.

I made this with some feta that I had frozen (gasp!) (A note on frozen feta: some people say never to do this, but I thought it tasted fine after it thawed. Just put it in something rather than eating it plain in, say, a salad because the texture changes a little.)

Spanakopita


10 sheets of thawed phyllo dough
2 tablespoons olive oil
1 large onion, chopped
2 cloves garlic, minced
2x 10 ounce packages of frozen spinach, thawed
6 ounces feta cheese, crumbled
1 tablespoon dried oregano
3 eggs, lightly beaten
1/2 teaspooon freshly ground black pepper
3 tablespoons unsalted butter, melted

In a medium sized saute pan, onions in olice oil until translucent. Add garlic and continue to cook another 2 minutes. Transfer to a bowl and allow to cool.

Drain the spinach well. (Really well, until no more liquid comes out when you squeeze it. I like to squeeze a bunch between two plates.)

In a large bowl, beat eggs with pepper and oregano. Add onion mixture, spinach, and feta cheese and stir until combined.

Brush one filo sheet with melted butter (cover the others with a damp towel so that they don't dry out). Place another sheet on top. With a pizza cutter, split the sheet in three (so you have three short rectangles). Place a scant 1/4 cup of filling at one end of each rectangle and roll as you would a tortilla wrap (fold the sides in when the spanakopita is half rolled).

Place on a baking sheet and brush the tops with melted butter. Bake at 375F for 20 minutes or until golden brown.

Makes 15 egg roll-sized spanakopita.

Recipe and image property of beets and bites

8/18/2009

Fit for the Queen: Victoria Sponge and Triple Berry Trifle

I was blog surfing when I came across a British one called "How to Make Cakes." There, I found a lovely recipe for Victoria Sponge that promised to be simple and delicious. I've never had Victoria Sponge, and it's not easy to find any in the area, so the best way for me to see what it tastes like is to actually make it. Besides, a "toss-everything-in-a-bowl-and-stir" cake that promises to be light and fluffy? This, I had to try.

I was surprised at how well it turned out. The eggs made the cake very flavourful and it was very tender. It's not what North Americans would call a "sponge cake"; it's more of a cross between butter cake and pound cake. Traditionally, jam and cream is sandwiched between two tall layers, but I had other plans instead...

One of my favourite English desserts has to be the trifle. I also think it's the perfect dessert to bring to potlucks for several reasons:
It's "make ahead" and tastes better the day after it's made.
It's assembled in a bowl so transportation is easy (a buttercream layer cake sliding around in the car in the summer heat=tragedy waiting to happen).
It looks pretty and pretty impressive.
It's not too heavy and rich after a big meal.
It can be adjusted to serve a few or many people.
And nobody can resist cake, berries, and cream.

There is much debate over what goes into the trifle bowl. Generally speaking, trifle consists of cake, cream, custard, spirits and fruit. There are hundreds of recipes and combinations out there, but in the height of summer, I like to make a simple, lightened version with tangy lemon curd and lots of fresh berries. However, the Victoria Sponge cake made it a little heavier than usual. If you try making trifle with chiffon or sponge cake and don't sog it down too much, the dessert could just float away...

Lemon Triple Berry Trifle
Serves 15

1 pint each: strawberries (halved and then sliced), blueberries, raspberries
3 tablespoons sugar
2 tablespoon lemon juice

2 cups whipping cream
2 teaspoons vanilla extract
3 tablespoons icing sugar

1 recipe of Victoria Sponge (or pound cake, or sponge cake, if desired)
1 recipe lemon curd (about 1 1/2 cups), thinned with a tablespoon of whipping cream if necessary

In a large bowl, combine berries, sugar, and lemon juice. Stir and macerate at room temperature for 30 minutes.

In a large chilled bowl, whip cream on high speed with an electric mixer until billowy and soft. Add vanilla and sift in icing sugar. Continue whipping until soft peaks form.

In a deep glass bowl, place a layer of cut up cake. Top with half the berries and drizzle juice on top. Make sure some berries are pushed to the side of the dish so you can see them through the side. Drizzle with lemon curd and then cover with a layer of whipped cream. Repeat layers, ending with a layer of whipped cream.

Decorate the top with whole berries (toasted flaked almonds are nice too). Cover and refrigerate at least 8 hours.

Victoria Sponge (http://www.howtomakecakes.co.uk/2007/09/back-to-victoria-sponge.html)

Ingredients
285g Self-raising flour
2.5 teaspoons (12.5ml) Baking powder
285g Margarine
285g Caster Sugar
5 Eggs
Raspberry or Strawberry Jam

Buttercream Ingredients
150g Softened Butter
340g Icing Sugar
3 tablespoons (45ml) Warm water

Equipment required
2 greased 8-inch sandwich tins
Sieve
Large mixing bowl
Electric whisk

Cake
- Sieve the flour and baking powder into a large bowl
- Add all the other ingredients into the bowl
- Using an electric whisk beat the ingredients together, starting slowly then medium until you get a smooth, creamy consistency
- Divide the mixture between the two sandwich tins and bake at 170 degrees centigrade (340 degrees Fahrenheit) for 30-40 minutes. The cake should be springy to the touch.
- When cooked immediately turn out onto a wire rack.

Buttercream
- Soften the butter and beat until smooth
- Gradually add the icing sugar, beating well
- Add the water and beat until smooth

Spread some jam on one half of the sponge and buttercream on the other and sandwich together. Sieve icing sugar on top

Tips
My tips for a good Victoria Sponge are:
1) Use good quality 8-inch sandwich tins. Line them with greaseproof paper to avoid the cake sticking
2) If you have a fan oven, do not use the fan feature. Cakes cook much better on the traditional oven setting
3) Be careful not to use too much jam or buttercream otherwise the cake may slide apart when sandwiched together. Do however spread the jam and buttercream to the edge of the sponges as this will enhance the appearance of the cake
4) When turning out the cakes onto the wire rack, try turning one out onto a solid surface (like a chopping board) and then put it on the wire rack so that the top of the cake does not get the marks from the wire rack. This will make it look much better.

Lemon Curd:
Yields 1 1/2 cups

3 large eggs
1/3 cup fresh lemon juice
1 tablespoon finely shredded lemon zest
3/4 cups sugar
4 tablespoons unsalted butter, cool and cut into small pieces

In a stainless steel bowl placed over a saucepan of simmering water, whisk together the eggs, sugar, and lemon juice until blended. Cook, stirring constantly (to prevent it from curdling), until the mixture becomes thick (like sour cream or a hollandaise sauce) (160 degrees F or 71 degrees C). This will take approximately 10 minutes. Remove from heat and immediately pour through a fine strainer to remove any lumps. Cut the butter into small pieces and whisk into the mixture until the butter has melted. Add the lemon zest and let cool. The lemon curd will continue to thicken as it cools. Cover immediately (so a skin doesn't form) and refrigerate for up to a week.


Victoria Sponge recipe courtesy of Mark Sanford and How to Make Cakes
Lemon Curd recipe courtesy of Joyofbaking.com
Image and trifle recipe property of beets and bites

8/17/2009

Pigs in a Blanket: Good Eats Pork Wellington

I'm a loyal Good Eats fan, and when this recipe aired on the "Tender is the Pork" episode, I put it on my lengthy list of things to make.

Pork tenderloin is lean and relatively inexpensive. It can also be dry and a little bland. This recipe takes care of all those possible glitches. The pork gets a huge boost of flavour from dried fruit, herbs and mustard. The tenderloin also gets wrapped in proscuitto (in a procedure called "barding"). This not only also adds flavour, but keeps the meat extremely moist (not overcooking it helps as well, of course). In fact, the meat gets so juicy that I had an issue with a slightly soggy bottom crust.

I will admit that I tried to use filo pastry here. This is one of those occasions when you just need to suck it up and splurge on the puff pastry; the buttery layers will help to "waterproof" the roll.

Staying with the "meat n' potatoes" route, I made some roast potatoes to go with the pork. Classic, simple, delicious.


Pork Wellington:

Serves 4

Ingredients

  • 1 whole egg
  • 1 tablespoon water
  • 1-ounce dried apple rings (I didn't use these, but I'm sure it'd be delicious)
  • 1 whole pork tenderloin, approximately 1 pound
  • 4 1/2 ounces thinly slice prosciutto ham
  • 1/4 teaspoon freshly ground black pepper
  • 1 teaspoon chopped fresh thyme leaves
  • 1 teaspoon all-purpose flour
  • 1 sheet puff pastry, thawed completely
  • 1 tablespoon whole-grain mustard

Directions

Place a rack in the upper third of the oven and heat to 400 degrees F.

Whisk the egg and water in a small bowl and set aside. Place the apple rings into the bowl of a mini food processor and process for 30 to 45 seconds or until they are the size of a medium dice. Set aside.

Trim the pork tenderloin of any excess fat and silver skin. Slice the tenderloin down the middle lengthwise, creating 2 separate pieces. Lay the tenderloin pieces next to each other head to tail, so when laid back together they are the same size at the ends.

Lay out a 12 by 16-inch piece of parchment paper on the counter and arrange the pieces of prosciutto in the center, overlapping them enough to create solid layer that is as long as the tenderloin. Top with a second piece of parchment, and using a rolling pin, roll over the prosciutto to help adhere the pieces to each other. Remove the parchment paper and sprinkle the prosciutto with the pepper, and thyme. Set the tenderloin down the middle of the prosciutto. Spread the dried apples in between the 2 pieces of tenderloin and push back together so the apples are held between them. Using the parchment paper to assist, wrap the prosciutto around the tenderloin to completely enclose in a package.

Sprinkle the counter with flour and roll out the pastry to 12 by 14 inches. Spread the mustard thinly in the center of pastry and lay the prosciutto wrapped tenderloin in the center of the pastry on the mustard. Fold the puff pastry up and over the top of the tenderloin, then roll to completely enclose, brushing the edges of the pastry with the egg wash in order to seal. Turn the tenderloin over so the side of the tenderloin with the double thickness of pastry is underneath. Pinch the ends of the pastry to seal.

Brush the entire pastry with the egg wash. Place the tenderloin on a parchment lined half sheet pan and bake for 25 to 30 minutes or until the pork reaches an internal temperature of at least 140 degrees F.

Remove the tenderloin from the oven, transfer to a cooling rack and let rest for 10 minutes before slicing and serving.


Golden Garlic and Herb Roast Potatoes

1 1/2 pounds Yukon Gold potatoes
5 cloves garlic, peeled and smashed
2 sprigs rosemary, bruised with a knife
2 sprigs thyme
1/3 cup olive oil
Kosher salt and pepper to taste

I prefer to parboil the potatoes first so they cook as quickly as the pork (above). To do this, halve the potatoes and drop in boiling water. Cook for 10-15 minutes or until barely tender.

Meanwhile, combine garlic, rosemary, and oil in a small saucepan. Heat over low heat until fragrant and small bubbles appear. Turn off heat and allow flavours to infuse (preferably at least 1/2 hour)

Drain potatoes and cut into 1 inch cubes. Toss with flavoured olive oil, salt and pepper. Spread potatoes, garlic, and herbs on a foil lined baking sheet.

Roast at 400F for 25-30 minutes (1 hour if the potatoes were not previously cooked). Stir potatoes once halfway through cooking to brown evenly.


Pork Wellington recipe courtesy of Alton Brown and Food Network
Potatoes recipe and images property of beets and bites

8/14/2009

Cornbread (and Soup Sacrilege)

I love rain. Really, I do. I like listening to raindrops drumming on the roof and cars swishing by. And it's not difficult to be satisfied when you live on the sodden West Coast. However, it's a bit of a rude awakening when you return from the hot, sunny Mediterranean climate and suddenly it feels like mid-February again. Sometimes the only appropriate thing to make on a day like this is a nice bowl of soup.

But I think I'm still in vacation mode because there was no way I was going to trudge out into the downpour to buy vegetables to patiently simmer for an hour or two.

Bless canned soup.

Luckily, though, there are some things that are always hanging around the house, like ingredients for cornbread. This is a very old recipe that my mom has made for years. I don't remember where it came from, but it makes a sweet bread with a pleasantly crumbly texture and crunchy top. And even better, I'm pretty sure the recipe is foolproof. In less than a half hour, I had a nice hot pan of cornbread to go with my soup. Let it rain, let it pour.

Cornbread:
Yields 1 8" square pan (9-16 pieces)

1 cup all purpose flour
1 cup cornmeal
1/4 cup sugar
4 teaspoons baking powder
1/2 teaspoon salt
1 cup milk
1/4 cup oil
1 egg, slightly beaten

Heat oven to 425F. Grease an 8 or 9-inch square baking pan. In a medium bowl, combine flour, cornmeal, sugar, baking powder and salt. Stir in remaining ingredients, beating by hand just until combined. Pour batter into pan and bake for 18-22 minutes or until toothpick inserted in the center comes out clean.

Image property of beets and bites

8/12/2009

Where to Eat (What to do): Barcelona

There are tons more tasty places to explore in Barcelona, and not just for eating!

Visit the Museu de la Xocolata
That's right, an entire museum devoted to chocolate. This small museum covers the history of chocolate and exhibits many mouthwatering displays. It's pretty much guaranteed that you'll be needing a bit to munch on afterward, so there is a well stocked "gift shop" in the main lobby. Oh, and the entry ticket itself is a nice surprise too...

Visit a market:

Mercat de Santa Caterina

One of the focuses of this market is the colorful undulating roof, which was built during the market's renovation in 2005. The market is not as famous as the Boqueria, but gives a slightly more local flavour to the market experience. Eat at La Torna for great, fresh tapas.

Mercat de Sant Josep de la Boqueria

A site humming with tourists, this is the most famous market in Barcelona. Officially opened in 1840, it boasts everything from fruits to fish to nuts and candies. The displays close to the main entrance are gorgeous and beg to have their photos taken by the thousands of tourists that pass through daily. The prices are more reasonable the further into the market you go. I was able to get a container of tiny wild strawberries for only a euro. They were the most strawberry-tasting strawberries I'd ever had! The market may look like chaos at first glace, but the market is actually well laid out into fish, meat, and produce sections.

Take a Cooking Class: Cook and Taste Barcelona
If you've got the time, I cannot recommend this more. The classes are 60 euros per person and offered in Spanish, French, and English. They last about 3.5 hours and the class size is roughly 10 people. They're appropriate for any level of experience in the kitchen; everyone has the chance to pitch in.
Cook and Taste also offers a guided trip to the Boqueria market to get ingredients (for a 12 euro supplement). I though that it really worth it. When else would I have the chance to actually buy and cook cuttlefish or farm fresh eggs from the market? I also learned things that I wouldn't have known otherwise. (Apparently, there is a stall selling cuts of meat from the, um, losers in local bullfights...) Seeing all the fresh produce makes you really want to cook, and that is exactly what you will get to do afterward.
The lady who taught the class, Theresa, was very friendly and knowledgeable. The class was well organized and the menu consisted of traditional Catalan dishes: gazpacho (modernized version), potato tortilla with tomato bread, paella, and crema catalana (and all the wine you can drink). It may sound biased for me to say that these were the most delicious versions of each dish I had on my trip (especially the paella), but it's true! I highly recommend this experience.

This wraps up the Barcelona portion of this "Where to Eat" special edition. Stay tuned as we return to our regular programming...

Museu de la Xocolata
Comerç, 36

Mercat de Santa Caterina

Francesc Cambó, 16

Mercat de la Boqueria

Plaza de la Boqueria, Ramblas

Cook and Taste Barcelona

La Rambla 58, 3rd floor
Reservations at: www.cookandtaste.net

Images property of beets and bites